

How To Create A Transparent Png File Without Photoshop
The other day, I was working on a presentation.
I was trying to come up with a way to add a logo and few icons into PowerPoint, but there was a problem. The images all had different background colors, and I needed them to all have a uniform look.
Maybe you've been there too. You have a logo, icon, or other image that you're trying to design with, but you need to remove the background of the image. You may need to add your company logo to a new image or add an icon to a PowerPoint presentation.
You can make the background of an image transparent with an advanced photo editor like Photoshop, with TechSmith Snagit, or with a variety of other tools.
Luckily, the approach is similar no matter what tool you are using. With Snagit, it only takes a few steps to quickly remove the background from your image.
How to make a picture's background transparent
Keep in mind that Snagit is not as sophisticated as a professional editing program like Photoshop, and it may not work to delete the background from a photo or image with complex backgrounds.
However, Snagit is the perfect Photoshop alternative to make an image transparent if you aren't familiar with high-end tools.
Free Trial: You can try Snagit for free. Get everything you need to capture and edit images on your Windows or Mac.
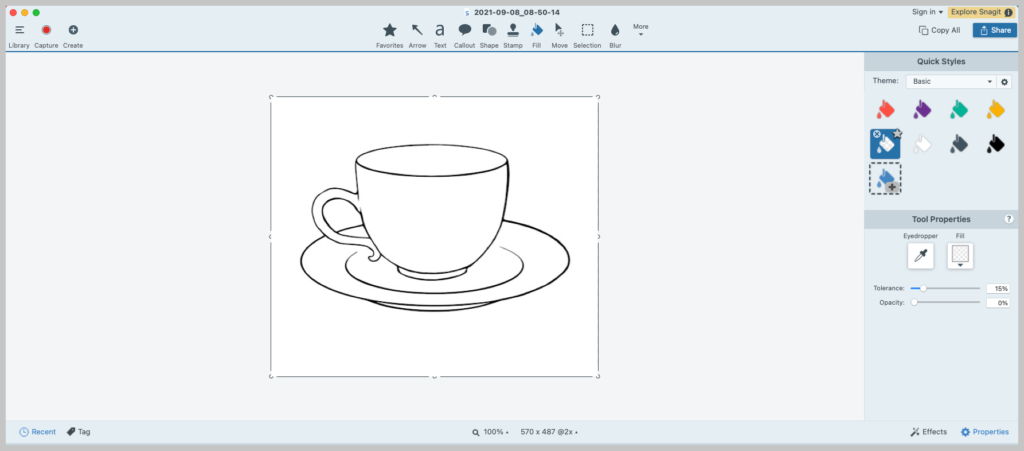
Step 1: Insert the image into the editor
Start by taking a screenshot with Snagit, or upload an image from the File menu. Images that have a white background, solid color, or high-contrast backgrounds work best.
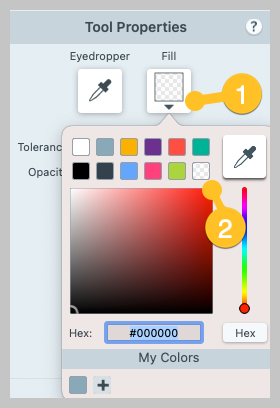
Step 2: Next, click the Fill button on the toolbar and choose Transparent

If you need to add a transparent fill to your Quick Styles for the first time, it's pretty simple. All you need to is click down on the fill color option in the Tool Properties and select the transparent fill.
Step 3: Adjust your tolerance
It's fairly easy to adjust the tolerance on this image because it's only black and white. But sometimes you have an image with lots of different shades. If you have an image with lots of similar colors or gradients in the background you may end up with some bleeding around the icon, logo, etc.
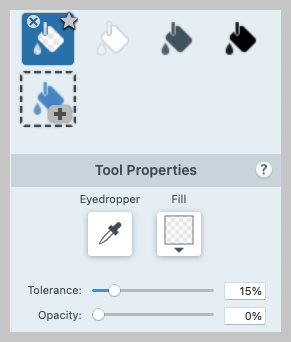
One thing you can do to remedy that is to adjust the tolerance of the fill. One percent is the most strict, and 100 percent means it will pretty much wash out your entire image. You may have to play with the tolerance to get the right transparency level.
Adjusting the opacity will dictate how transparent you want your fill to be. The more opaque, the less transparent your fill. So if you want your background completely removed, go with 0%.
Step 4: Click the background areas you want to remove
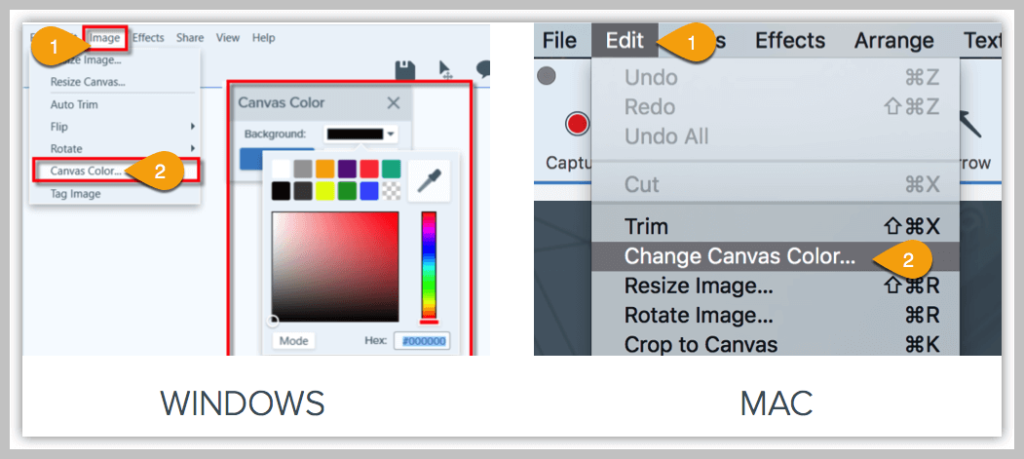
If you are using a screenshot or a PNG image, it will default to have a transparent background. If you are using a JPG or other file format, you'll need to adjust your background color in the Snagit editor first or it will default to white rather than transparent.
To do this, simply click Image > Canvas Color (on Windows) or Image > Change Canvas Color… (on Mac).
Step 5: Save your image as a PNG
If you don't save your image as a PNG file, it will default your background to white.
And that's all there is to remove the background from an image. It only takes a few steps and gives you the freedom to create a seamless look to your training documents, marketing materials, or presentations.
Free Trial: You can try Snagit for free. Get everything you need to capture and edit images on your Windows or Mac.
How To Create A Transparent Png File Without Photoshop
Source: https://www.techsmith.com/blog/how-to-remove-the-background-from-an-image/
Posted by: millercrummon.blogspot.com
0 Response to "How To Create A Transparent Png File Without Photoshop"
Post a Comment